07 December 2009

Bunk Beds


I had about a week off classes over Thanksgiving break and the weather was lovely so I shot my wad of cash on some 4 x 4's and made a bunk bed I had always wanted to make. I made all the joints of mortise and tenon style. The bed has 6 18"deep drawers under each bunk. Now I can throw away the rinky dinky trash dressors in my room and me and Chippy can store everything that was in the dressors in the bunk bed drawers. This bed is too heavy. Me and Chip can barely lift it up. But at least one of these nights after a heavy snow when my 70 year old matchstick, chicken-coop roof falls in, Chip and i will survive thanks to this grotesque mamoth of a bunk bed I have made.


15 October 2009

Jared's Deck Complete

I finally finished Jared's deck today. I think it took about 6 weeks. I am very satisfied with the way it turned out. It was nice to work for Jared again. He always makes sure I have everything I need when I need it and when he sees I need help doing something he helps right away. Below are some more views of the deck.


13 September 2009

Jared's deck under construction

Jared called me over to fix his deck. The one that was there when they moved in was garbage. It looked like a 7th grader built it. Part of it was sitting down in the dirt rotting. It wasn't bolted to the house and it wasn't level. So we tore it apart and reused some of the lumber. We built the new one "from the top down". Instead of trying to guess at where to dig the holes and where to set the posts we built the frame on the ground then bolted it to the house then leveled it. It is held in place by temporary stakes. Then we hung the posts down into the holes temporarily bracing them plumb. Then we poured the concrete in the holes. When the concrete cures we will take off all the temporary braces and stakes. Most dummies and novices just go dig holes wherever, dump concrete in them and shove posts in. How are you supposed to get things plumb and level and square and parallel like that?
I will put up more pictures of the deck when I finish. So for all the millions and millions of readers that see this blog post you are just going to have to wait a few weeks until I update this post.

25 August 2009

Built in Armoire at my house


I ripped out the old garbage shelf and drawers that were in the hallway and made the opening bigger. I put in this cabinet. It has a high rod behind locking doors to hang up clothes. It has 4 large locking drawers down low for more storage. Because the small bedroom doesn't have a closet this will nicely substitute for a closet.


12 July 2009

Jared's Bathroom


Jared called me over to finish his master bathroom. When they bought the house there was a doorway going from the master bathroom into the kitchen. In the corner of the bathroom there was an old tile shower. That was kind of weird so they wanted to rip out the shower and make a wall where the doorway was. So we ripped out the door and the old shower and filled in the wall there. The old tile shower had bad grout so water was leaking down into the basement. They installed a new tub there. I sheet rocked around it. Then I put cultured marble around the tub and put new vinyl flooring down. I put waterproof base around the floor and siliconed it in. Now there is a more watertight seal to the entire bathroom.

The pictures don't show it but I put the toilet back in and put the shower valve and tub spout and shower spout it. I put the exhaust fan and light in as well.

20 June 2009

New Side Fence at my house


This is the old garbage fence that I replaced. It was about ready to fall over on my driveway. It was very poorly constructed. It was crooked like a snake. The abortion doctors who built it just buried the posts in dirt so all the posts were rotting out beneath the surface of the ground.


My house didn't have curb appeal. The only thing this old fence was good for was to induce vomiting. So I rented a U-Haul and I ripped this garbage out one Saturday and hauled it off to the dump. At first I was like "I am just going to replace a few rotten posts. But the first planks I tore off I knew nothing was worth salvaging. So I committed to go all new.

A few weeks and thousands of dollars later; I have a strait, strong, level, plumb, privacy fence. I lost some property and I paid a concrete cutter to cut out some of my driveway but I have a strait fence now. "A good fence makes good neighbors" I like my neighbors so much better now that I have put a 7 ft tall fence between us.

I poured a concrete footing under all the posts so that way my fence isn't sitting in the dirt soaking up moisture. Now those mangy cat's can't get crawl under the fence into my yard.


I made it step down here so when pulling out of the driveway I can see what's in the street.


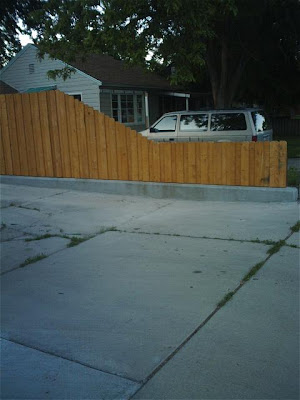
This shows the fence frame. I bought a cordless impact driver to drive the timber lock screws that lock the 4x4's above to the posts. The 4x4's above carry the weight of the pickets since I kept them 1/2 inch above the concrete. I don't want them sitting down in water.


Here is a view from the back yard. Notice how level the fence is. I bought a laser level and cut all the posts level since my lot is level I said "Why not have a level fence?"


I put a gate to close off the back yard from dogs and cats and vagabonds. It gives more privacy and security to my back yard.


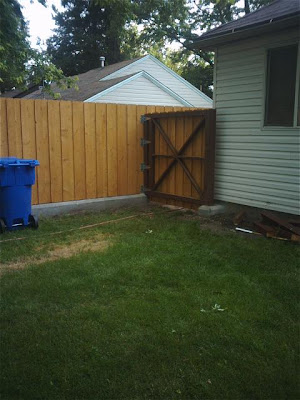
I still have to put the bolts on so the gate can be locked. The gate is so heavy I had to rest it on the footing to keep it from pulling the fence out of plumb. It is a necessary evil but I don't mind because it will keep the fence from sagging over time.


I want to thank Chippy for all the hours he spent under my direction working on the fence. Even though I paid him for his time I feel like I got an excellent value from him. I also thank Alicia for spending a few hours one Saturday helping paint and install the pickets. What goes around comes around.

30 March 2009

Garden Shed

I built a garden shed for Garth. Now he can put his lawn mowers and garden machines and garden tools in here and keep them out of the rain and snow. It turned out nicer than I had excpected.

14 March 2009

Jared's Basement


I have been working on my uncle's basement for the past few months. We ripped out half of the old junk that someone else had "finished" and we finished it off right. We didn't just glue sheetrock to the concrete like the Morons who owned the house before him. We framed in 2 bedrooms and a food storage room. We installed all the framing our selfs. We did all the sheetrock. And I did the finish carpentry. I am pleased with how it turned out.


01 February 2009


I have been wanting this saw for years! This is a 12 inch dual bevel compound sliding miter saw by DeWalt. I bought it because I have my other miter saw down in AZ. I need to get set up here in UT to do my furniture projects. I am finishing my uncle's basement and I will need this saw for the finish carpentry.

09 January 2009

Busy Christmas in Heber


Here I am with a bookcase I did for a lady in Heber. It's hard to see but it has raised panel doors. I got a new router table so now I can do raised panel doors in my projects. I also made the crown moulding around the top on my router table. It was a fun project.

I tore out the old tile that was surrounding the tub in my parents bathroom. The grout had deteriorated away and water had gotten back there and molded the framing. So I ripped all that crap out and put up new cultured marble. I put in a new vinyl window while I was working right there too.


I went down to AZ for Christmas. I stripped the old shingles off my parent's roof. I nailed the roof deck down again to the trusses. I put new underlayment and Owen's Corning 50 year shingles on. A lot of my family helped. It turned out nice and we saved my parents thousands of dollars by doing the labor ourselves.