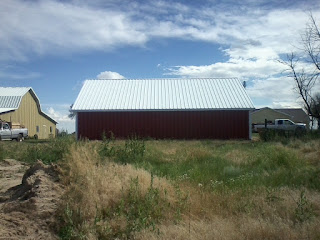
In the center of the photo, between the windbreak and the house, you see the barn I have been working on remodeling all summer. It is in a beautiful, isolated spot smack- dab in the middle of acres, and acres of wheat fields out here in Eastern Colorado.
This is the before shot. It was used to store grain in the old days. They would pile grain in there with tractors and store it. All the pressure of the grain and tractors hauling it in and out would push the exterior walls out over time. Additionally, the raters were not adequately braced at mid-span so the roof was sagging. These old doors on each low side of the barn were the only way in and out. It was a mice paradise in there when they used to store grain inside. Yes, we cleaned out all the dead mice and mice feces in the wall cavities before putting new metal siding on. Now it doesn't reek inside anymore.
We, (the owner and I) did a lot of interior framing to shore up the sagging roof and pull the exterior walls back in line. Above these interior walls is a ceiling/floor that keeps the exterior walls from pushing out again. There are 4 shear walls tied in to each exterior wall on each side of the barn now. There are 4 rooms 8' x 8' on each side for storage or craft use. The middle is an enormous corridor which will accommodate the owner's 13' tall camp trailer; hence the 14' tall custom made door by your's truly.
I hope this picture is proof that we got the sag out of the roof. This shot before I fixed the rafters looked like a ski jump.
Here is the back side of the barn. Those are 20' panels on the roof. It was a big job for only 2 guys.
This is how I got the ridge cap on. The roof is a 7.5/12 with new metal roofing. It is too slick to stand on so I had to put up roof jacks and planks all along the peak. I put a 33' extension ladder in the bed of my truck along the slope of the roof. This way I had access up to my plank line. I used the safety rope and body harness to tie my body off to the roof when putting up the roof jacks. It took all day but the ridge cap is on and I didn't get hurt. The ladder wouldn't not have been very stable on the ground.
Here is a picture of Your's Truly putting on new fascia all the way around the existing roof. There wasn't any existing fascia at the eaves. The fascia at the rake was rotten and falling off the roof. That is the old tin you are looking at up there before we got it all off. F. Y. I.: That old tin comes off well if you get under it with a long (7') bar and roll it up like carpet. Also notice from this picture that I framed in and installed new windows and a new man door.
Well, putting on that new fascia really made this old, ugly, pig-of-a-barn into an attractive lady dressed to kill; in red.
We framed this opening for a new 10' x 10' overhead door. The door has just been ordered and hasn't arrived at the job site yet. I'll have to go back later and put this 10' door on.
There was no way to get a 14' tall over-head door on this opening because such a tall door would have required more room above it than we had in order to accommodate the track; so I said, "I'll make a door".
And that I did. We didn't have enough full pieces of red panels left so we came up with a sharp little design for the double in-swing doors we made. We incorporated the panel laps into our design.
Just to give you an idea of how tall these doors are, I had the owner pose next to them. Both he and I are under 6' tall so you can imagine how we 2 dwarfs got these monster doors built and installed; we had his wife help us tilt them up - of course!
The doors open really nice. I have each of them on 5 gate hinges and spring loaded rollers as seen in one of the interior photos above so they skate right across the uneven concrete floor and open quite nicely. Now this edifice is no longer a barn; it is a classy garage suitable to house a 13' tall camper trailer.
We got the over head door on the other end. It is a 10' x 10' door. We had to get a special track assembly so the overhead tracks wouldn't hit the trailer when it was pulled all the way into the garage. The instructions that came with the door were poorly written so it took us 2 days to figure out how all the parts went. The door opens and closes fine now. Now I know how to install garage doors.


3 comments:
You're amazing, Jonathan! You bless lives with your skill and talent wherever you go. This is gorgeous!
I am very impressed with your work! It is a work of art!
Karen Cheney said...it is so fun to see the finished project after we were able to get the tour along with your comments and plans when we visited you. Truly you are beautifying Simla one project at a time.
Post a Comment